
Contents
Last month I wrote a blog called 6 mistakes to avoid when using Flow designer that listed the six most common mistakes I see when reviewing other people’s flows. The post was followed by a great discussion on LinkedIn, with heaps of additional suggestions to help people write better flows.
This month I have decided to extend the list with another 6 things to avoid.
This is not a list of best practices, but it is a list of practices to avoid!
Always starting with Flow
If you are a ServiceNow dinosaur like me you may recall using Workflow editor, where every workflow could call a workflow by dragging and dropping another workflow into the canvas. 
With Flow designer, ServiceNow has split what was ‘Workflow’ into Flows and Subflows. Flows can call subflows by a similar drag and drop mechanic – and subflows can call subflows, but a Flow cannot call a flow; only subflows. This can be annoying if you want to re-use logic from another flow, where this used to be easy in Workflow editor. To avoid falling into this trap, you need to switch your thinking, and start by creating subflows instead. Start thinking of Flows as a vehicle to trigger one or more subflow, which can be re-used across the enterprise.
There is one notable exception to the #startwithflow rule. When creating sequences of fulfilment tasks for service catalog, you may want to stick with Flows, because you can’t set stages in between actions in subflow. You might be thinking “that’s fine, I can just set the stage manually using an Update Record” action, so read on to find out why that isn’t a good idea.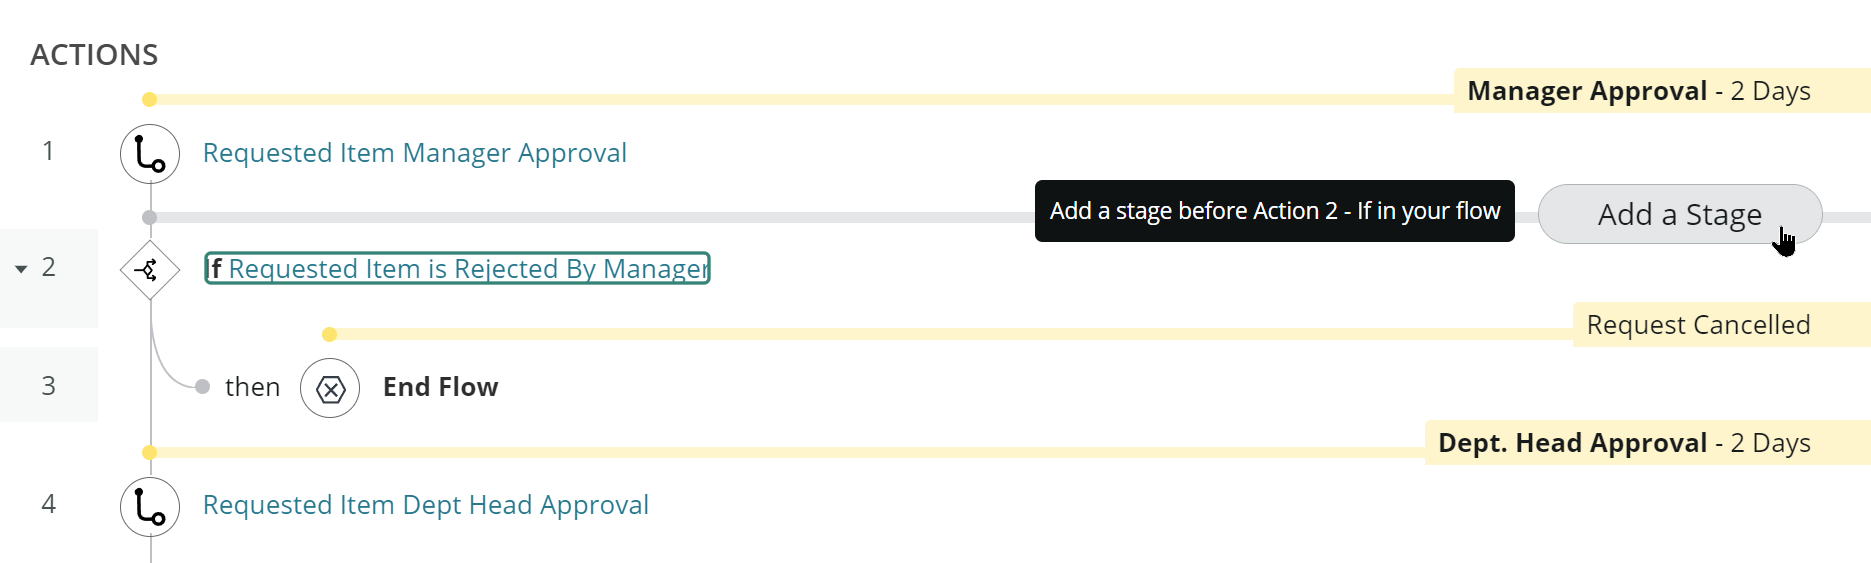
TLDR: Start with Subflows (except for Service Catalog)
UTAH Update: You can now convert actions from a flow into a subflow!
Forgetting to add stages
When creating flows for Service Catalog, stages can be particularly helpful in informing the user where in the fulfilment lifecycle their Requested Item is (e.g. Approval, Fulfilment, Delivery). While some are provided out of the box, you can create any stage you want to represent the stage of a requested item’s lifecycle, which can be quite informative for your end users. The stage is presented to the user in Service Portal using a stage renderer, which works in a different way to the legacy workflow, resulting in some strange behaviours.
The first time you run a flow, stage display values are rendered based on stages available in the defined stages of that flow. You can have all your fulfilment tasks in subflows where you set the stage using an ‘Update Record’ action, or even do so in your flow, and the stage display values will all render as expected in your Service Portal.
The second time you run a flow, it works a little differently. On the second generation of a flow, it uses stages defined within the actions of the first flow’s context to render the display values. If your stages are not in the flow, the system won’t render the display names in the portal, instead rendering the value. Then, you will end up presenting something like what is shown below to your end users, and be taken totally by surprise!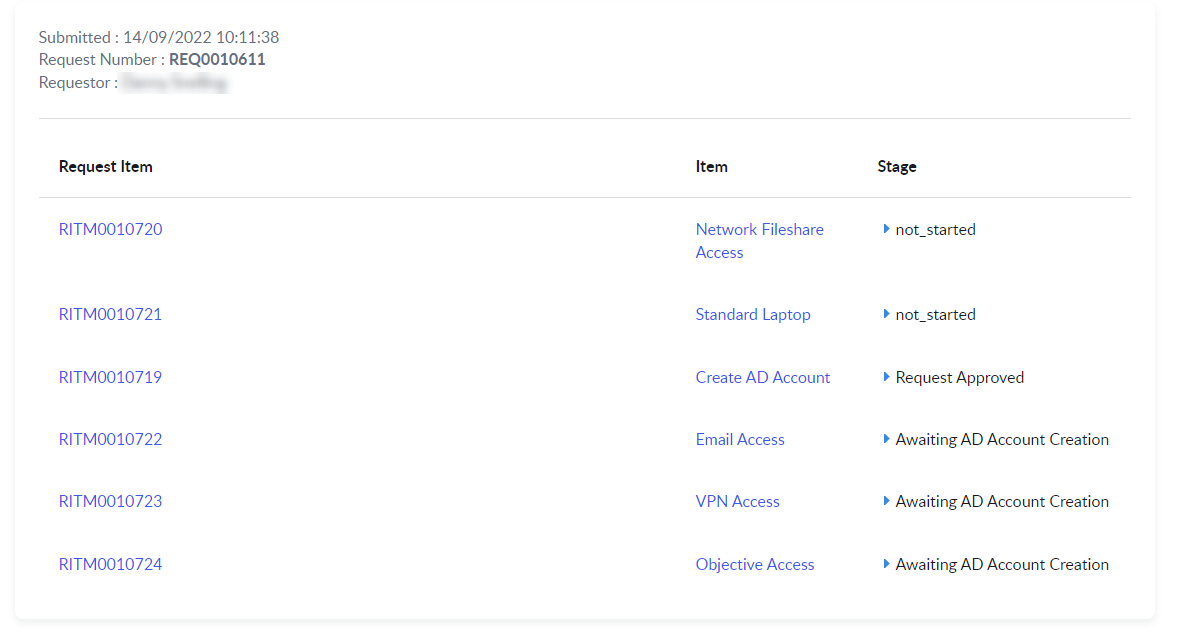
You can see above, using stages can be a powerful tool to inform the user of the progress of their requests, but if you don’t use stages correctly, you may end up with unhappy users. You can see that Network Fileshare Access and Standard Laptop requests used the value of the ‘Awaiting AD Account Creation’ stage (which is not_started_, but Email Access, VPN Access and Objective Access did, either because it was the first time a context was generated for them, or the stage was added in between the actions on the flow.
TLDR: Leverage stages and set them between actions in your flow
Forgetting to use the error handler
Nothing strikes fear into a flow administrator more than when something has gone wrong and you open your Flow to see something like this: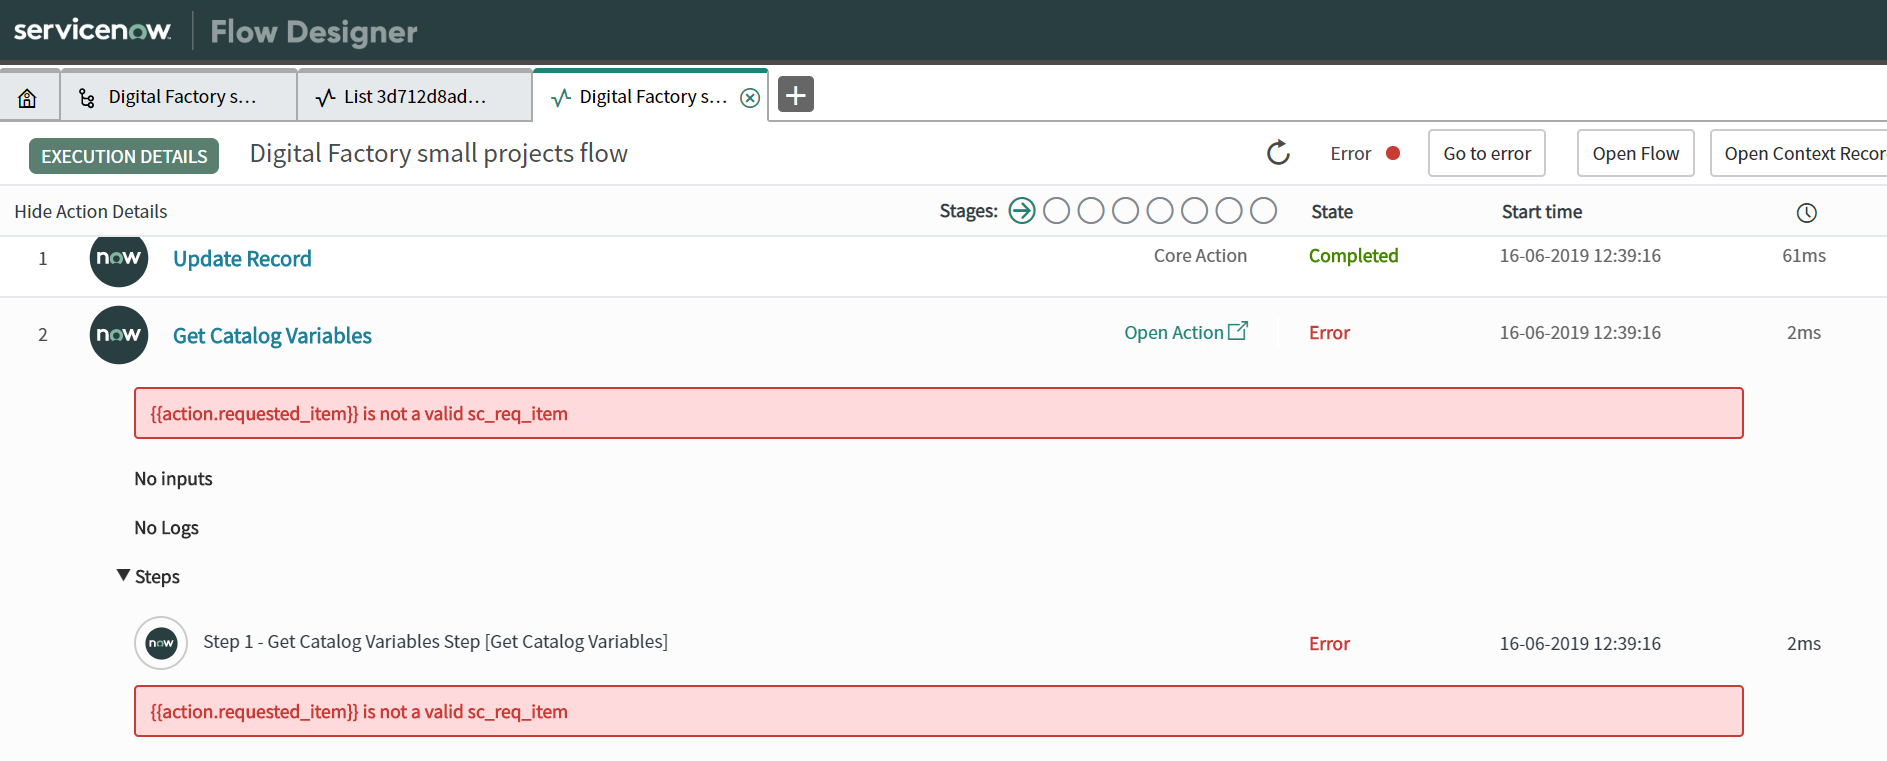
Looks like someone forgot to put in some error handling! When flows throw an error and you don’t handle them, the flow stops. There is no retry, no going back, the process is broken.
Tucked away at the bottom of the flow (or subflow) is your error handler. 
If you are familiar with scripting, it is like all your actions are wrapped in a try-catch block.
try {
   // actions here
} catch (e) {
   // error handling here
}
Having your logic handle errors will help you re-attempt certain logic and gracefully complete the flow.
TLDR: Use the error handler to continue your flow gracefully
Relying on the error handler too much
If you are a coder, you don’t always (hopefully) wrap a try/catch around all your code, rather, you first try to prevent errors from being thrown in the first place, and save using try/catch for catching errors from 3rd party API or other circumstances when you need your code to continue gracefully. The same principle can be applied to flow designers – preventing errors within your flow can be easier to work with than catching them.
For example, when executing a ‘Lookup record’ action, getting zero results is considered an error at runtime. 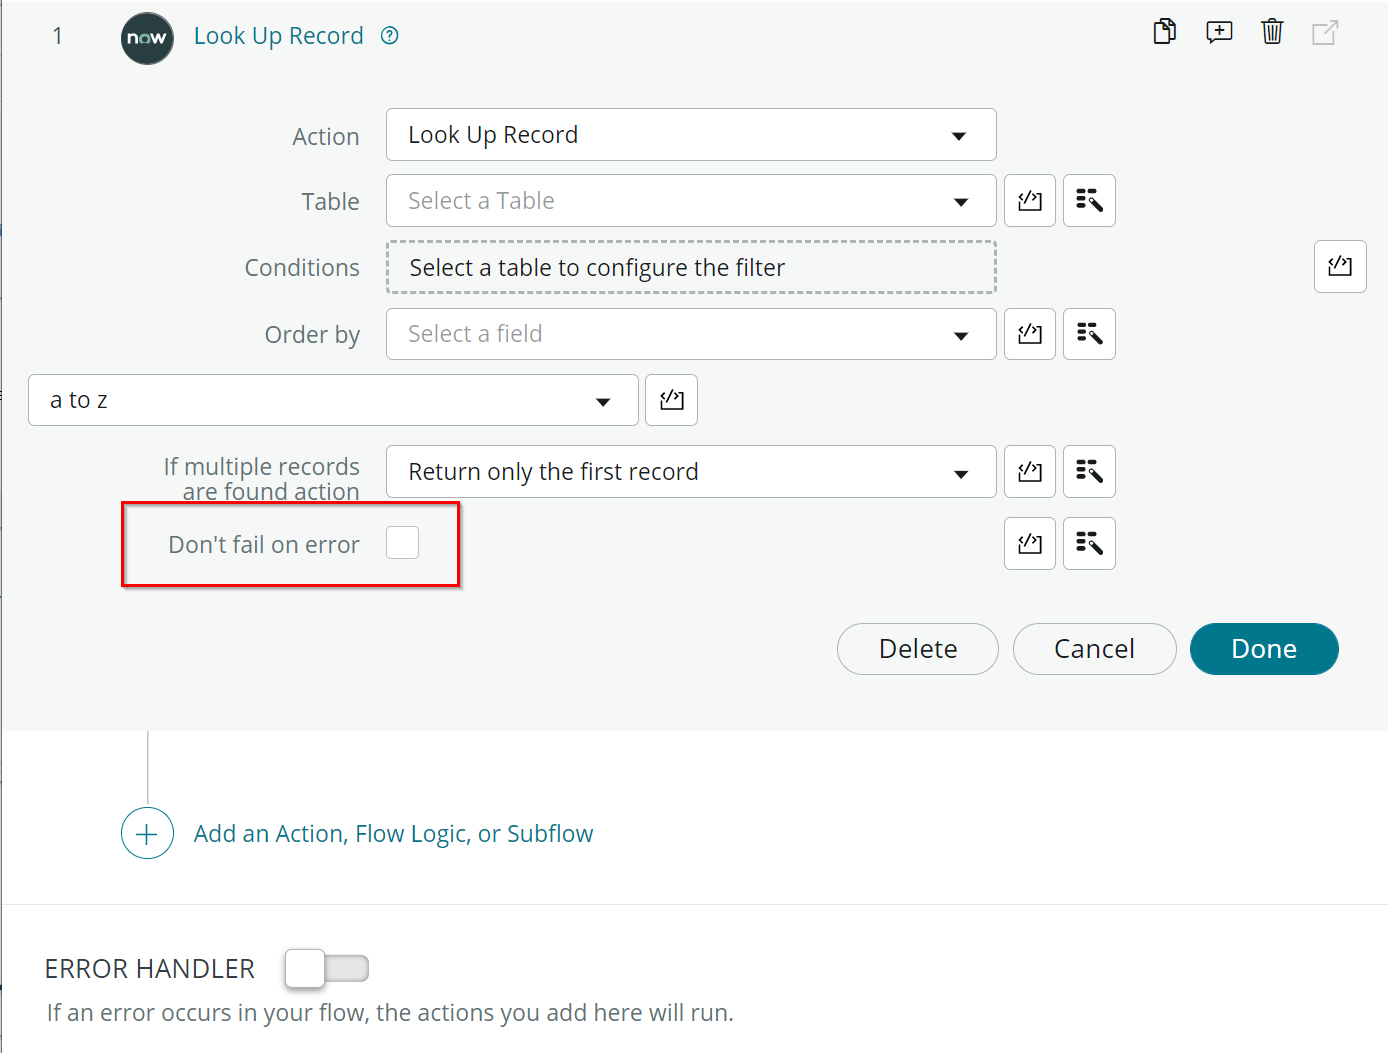
Rather than relying on the error handler for everything, consider checking the ‘Don’t fail on error’ box and handling this specific error yourself: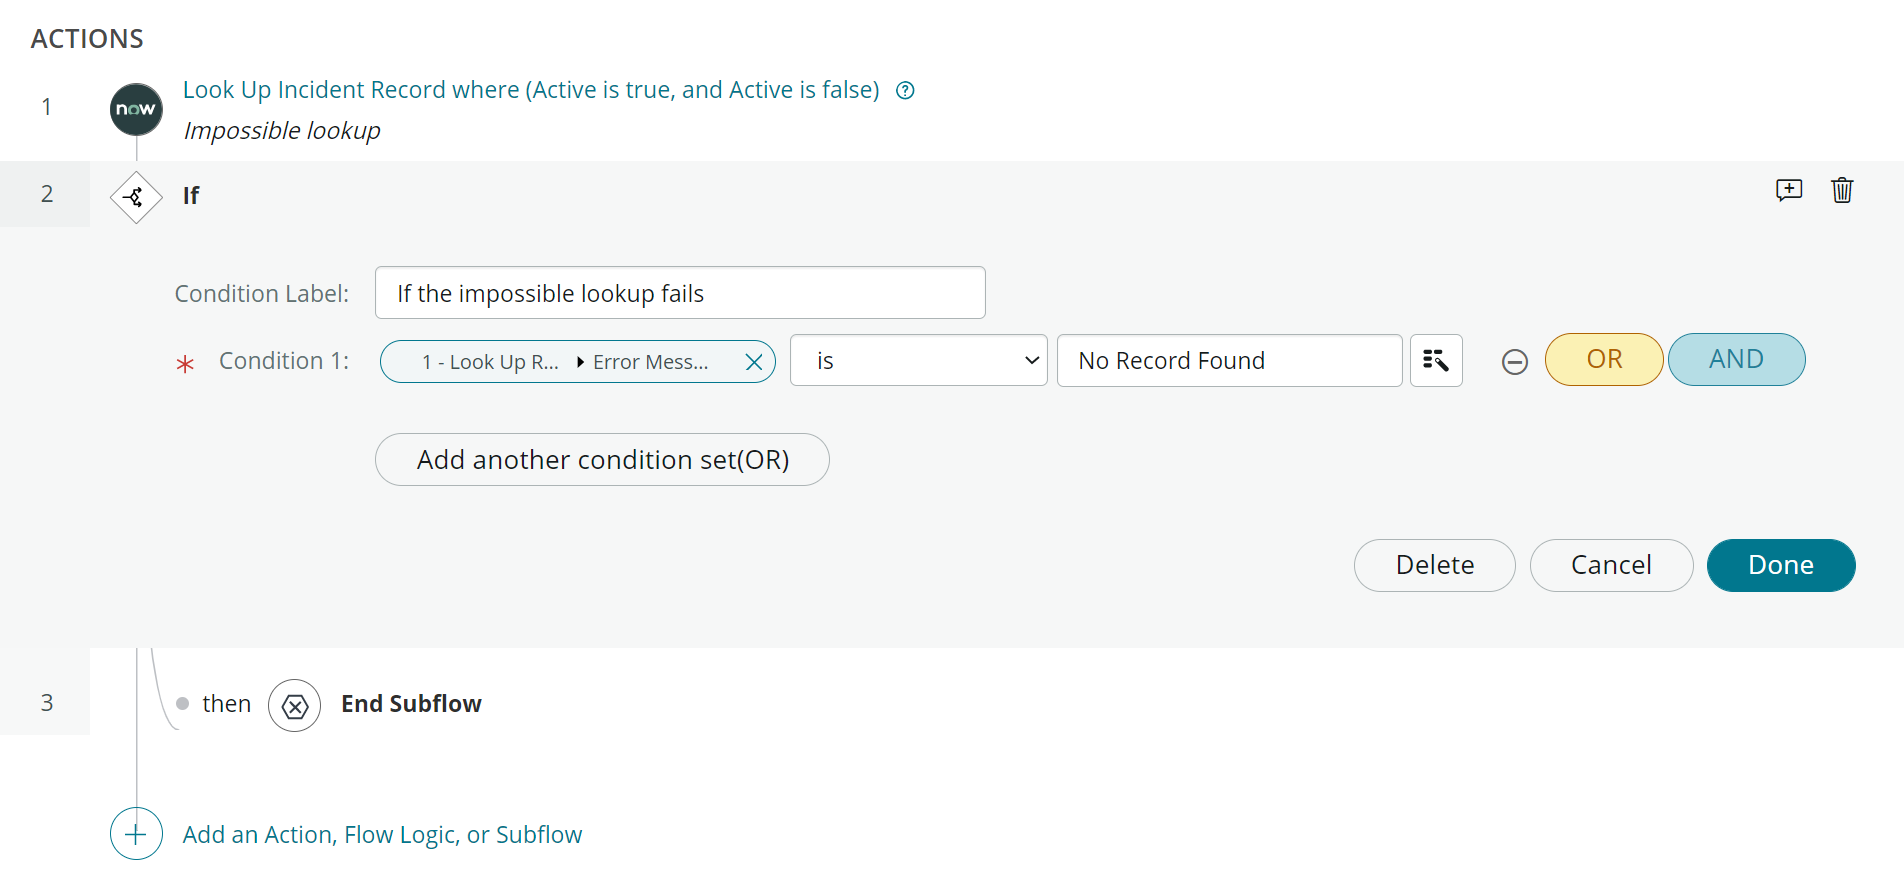
Let’s not forget, you can also use error handling for specific actions: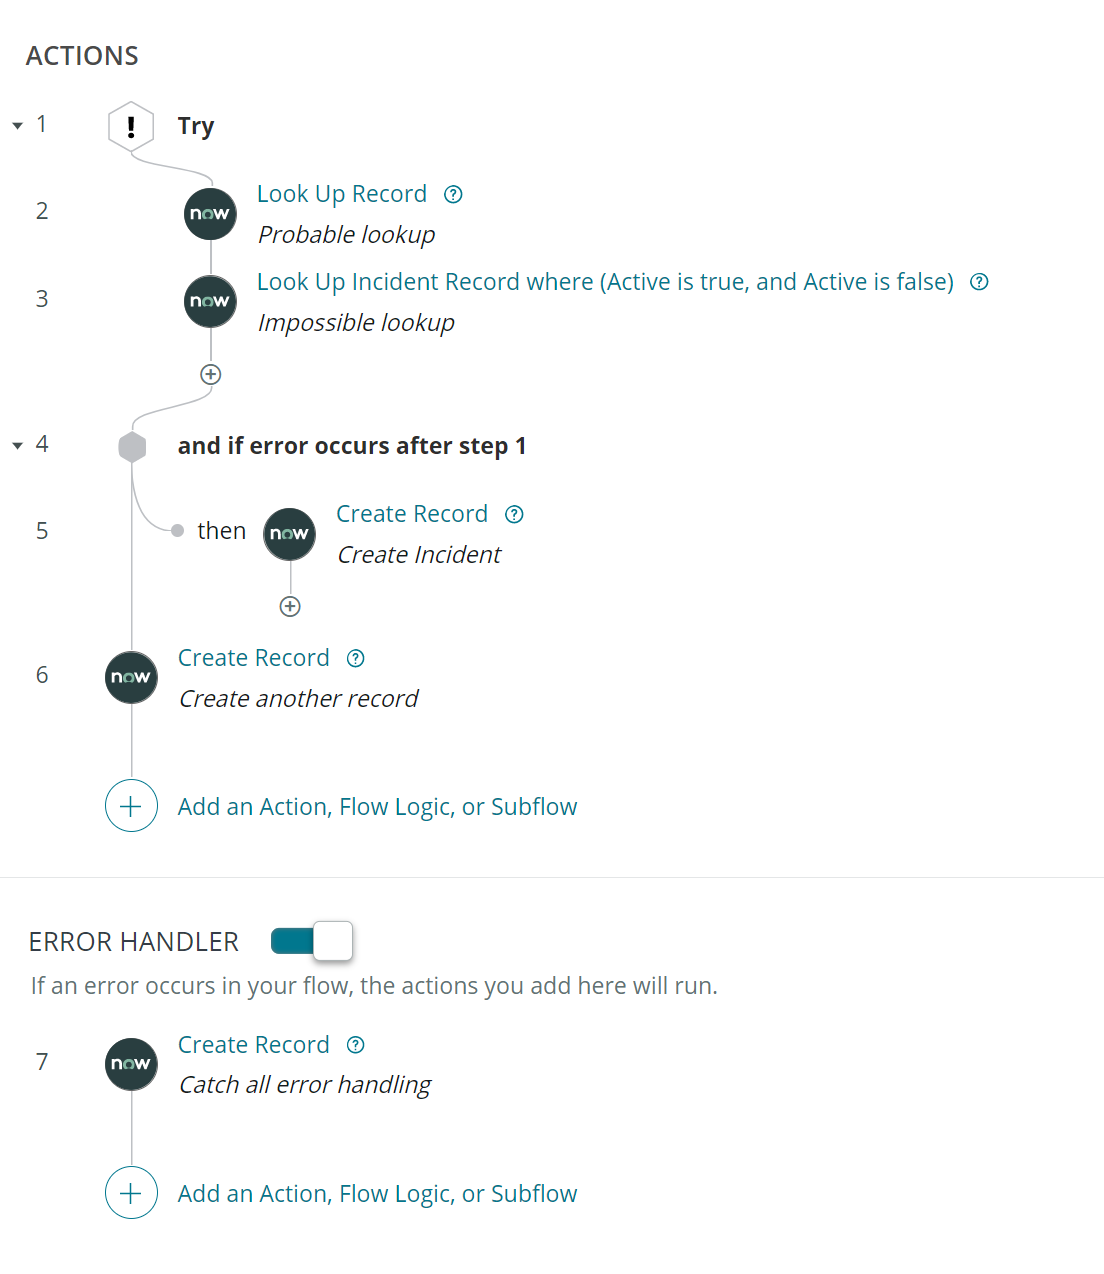
Which would be the equivalent of the following code:
try {
   try {
      lookUpRecord(); // Probable lookup
      lookUpRecord(); // Impossible lookup
   } catch (e) {
      createRecord(); // Create Incident
   }
   createRecord(); // Create another record
} catch (e) {
   createRecord(); // Catch all error handling
}
TLDR: Use don’t fail on error and try flow logic before relying on the error handler
Writing too much code in actions
In the first ‘6 mistakes to avoid’ list, I observed that flow creators often misuse the action in-line code editor, when they would be better off moving that code into a custom action so it can be re-used. I received feedback that I didn’t take this advice far enough, as it is often followed up by another mistake, which I am guilty of aswell – writing too much code in a custom action. Every line of code written in a custom action is exclusive to that action and is not available for re-use outside of that action and any flow using that action. Other developers may wish to use your code in other script includes or business rules, so free your API by writing as much code as you can in script includes instead.
Take the example code from an action below to add a user to a watch list:
(function execute(inputs, outputs) {

  var taskGr = inputs.task;
  var userGr = inputs.user;
  var addedUsers;
  var newWatchListUser = userGr.getUniqueValue();
  var watchListUsersString = taskGr.getValue('watch_list');
  if (!gs.nil(watchListUsersString)) {
    // Watch list is stored as comma seperated string of sys_id and email addresses
    var watchListUsersArray = watchListUsersString.split(',');
    var addUser = userGr.getUniqueValue();
    var isUniqueUser = watchListUsersArray.indexOf(addUser) > -1;
    // SN does not handle duplicate users, so we have to
    if (isUniqueUser) {
      watchListUsersArray.push(userGr.getUniqueValue());
      newWatchListUser = watchListUsersArray.join(",");
      addedUsers = newWatchListUser;
    }
  } else {
    addedUsers = newWatchListUser;
  }
  taskGr.watch_list = newWatchListUser;

  if (!taskGr.update()) {
    addedUsers = '';
  }

  outputs.addedUsers = addedUsers;

})(inputs, outputs);
In your custom action, focus purely on calling your script and setting the outputs. Create a Script Include for your logic:
var FDActionUtil = Class.create();
FDActionUtil.prototype = {
    initialize: function() {},

    addToWatchList: function(userGr, taskGr) {
        var addedUsers;
        var newWatchListUser = userGr.getUniqueValue();
        var watchListUsersString = taskGr.getValue('watch_list');
        if (!gs.nil(watchListUsersString)) {
            // Watch list is stored as comma seperated string of sys_id and email addresses
            var watchListUsersArray = watchListUsersString.split(',');
            var addUser = userGr.getUniqueValue();
            var isUniqueUser = watchListUsersArray.indexOf(addUser) > -1;
            // SN does not handle duplicate users, so we have to
            if (isUniqueUser) {
                watchListUsersArray.push(userGr.getUniqueValue());
                newWatchListUser = watchListUsersArray.join(",");
                addedUsers = newWatchListUser;
            }
        } else {
            addedUsers = newWatchListUser;
        }
        taskGr.watch_list = newWatchListUser;

        if (!taskGr.update()) {
            addedUsers = '';
        }

        return addedUsers;
    },

    type: 'FDActionUtil'
};
And only use your custom action to handle setting the outputs.
(function execute(inputs, outputs) {

  var taskGr = inputs.task;
  var userGr = inputs.user;

  var flowActionUtil = new global.FDActionUtil();
  var addedUsers = flowActionUtil.addToWatchList(userGr, taskGr);

  outputs.addedUsers = addedUsers;

})(inputs, outputs);
TLDR: Use script includes and call them in your custom action
Forgetting to use Flow variables
Don’t forget to use Flow variables to reduce the duplication of your “low code”. If you ever find yourself needing to duplicate any kind of logical check – stop right there and create a flow variable!
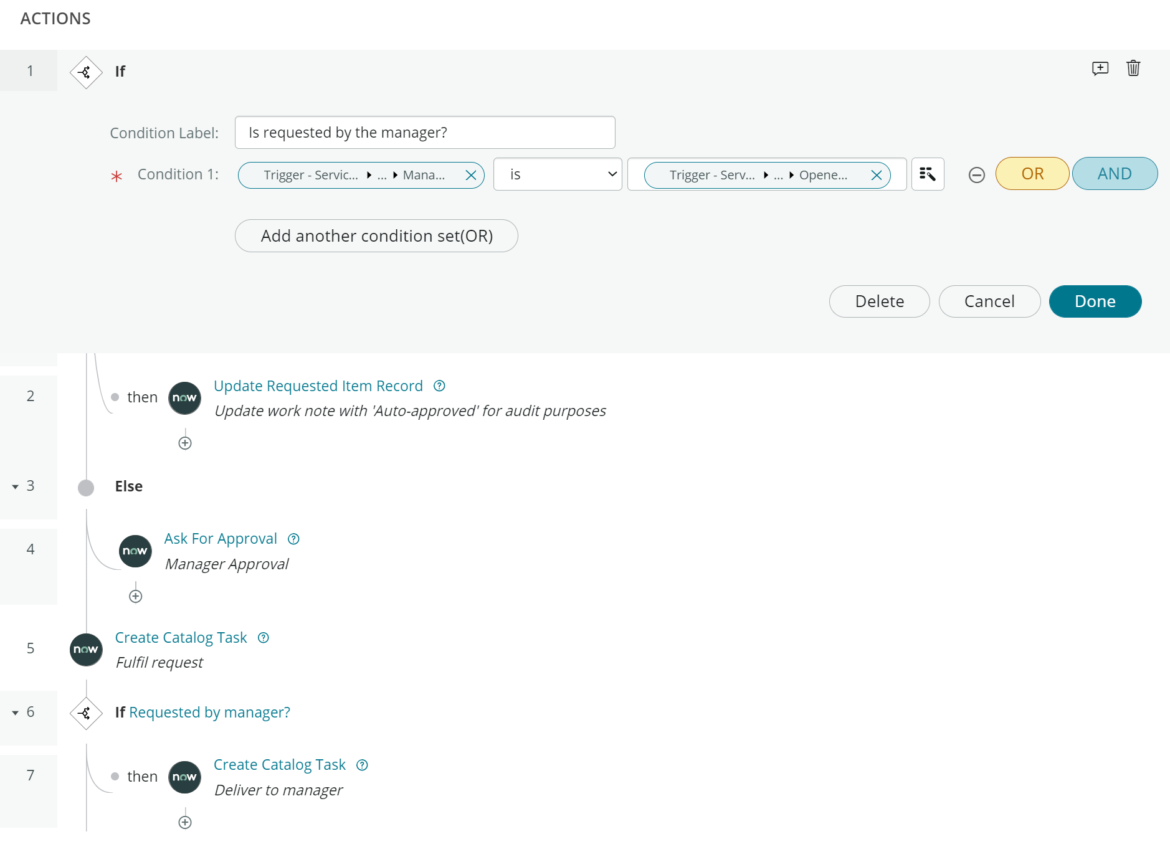
Take the example below of a request workflow where approval is not required when the item is requested by the service recipients manager and is delivered to the manager if they are raising it for their staff:
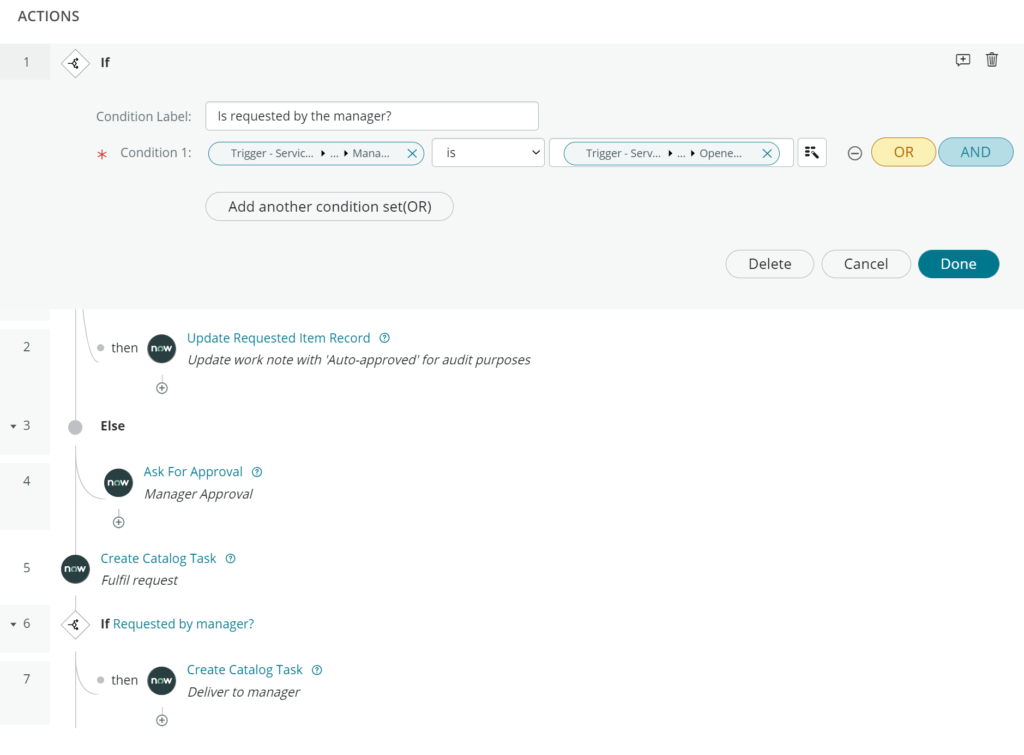
In the example, the logic to check ‘Is requested by manager’ is duplicated in actions 1 and 6.
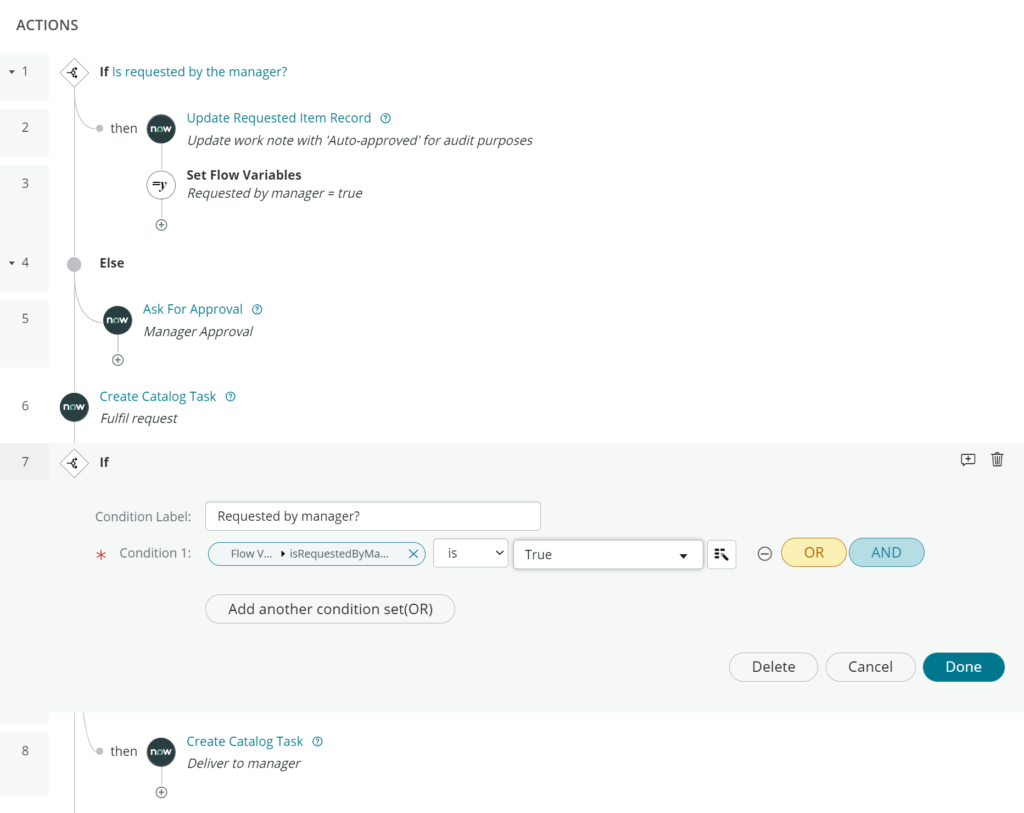
Instead, consider using a Flow variable to set ‘is requested by the manager’ and re-used in action 6:
TLDR: Use flow variables to reduce duplication
1 comment
Note, flow’s can call other triggered flows. There is a flow preferences option “Show triggered flows” which exposes all triggered flows in the subflow picker. Aka, you can call a flow from a flow. The trigger defines the inputs (e.g. current, or in the case of email, kafka, REST or other it will show the appropriate inputs).